Strange: the IoC framework for Unity
Get as PDF
Instantiating injectable instances
Some things you can do with Injectable Classes
Mapping Signals Without Commands
3. MVCSContext: the big picture
Strange: the IoC framework for Unity
Strange attractors create predictable patterns, often in chaotic systems.
Introduction
Strange is a super-lightweight and highly extensible Inversion-of-Control (IoC) framework, written specifically for C# and Unity. We’ve validated Strange on web, standalone, and iOS and Android. It contains the following features, most of which are optional:
- A core binding framework that pretty much lets you bind one or more of anything to one or more of anything else.
- Dependency Injection
- Map as singleton, value or factory (get a new instance each time you need one)
- Name injections
- Perform constructor or setter injection
- Tag your preferred constructor
- Tag a method to fire after construction
- Inject into MonoBehaviours
- Bind polymorphically (bind any or all of your interfaces to a single concrete class)
- Reflection binding dramatically reduces overhead of employing reflectivity
- Two styles of shared event bus.
- Both dispatch events to any point in your application
- Both map local event bus for local communication
- Both map events to Command classes to separate business logic
- The new Signals implementation adds type saftety
- NB: Examples in this document use the default EventDispatcher. We've added a section explaining Signals, but didn't, frankly, have the patience to re-write the entire guide. Nevertheless, we encourage the use of Signals as the preferred means of communication.
- MonoBehaviour mediation
- Facilitate separation of a view from the application using it
- Keep Unity-specific code isolated from the rest of the app
- Optional MVCS (Model/View/Controller/Service) structure
- Multiple contexts
- Allow subcomponents (separate Scenes) to function on their own, or in the context of larger apps.
- Allow communication between contexts.
- Don’t see what you need? The core binding framework is simple to extend. Build new Binders like:
- A different type of dispatcher
- An entity framework
- A multi-loader
In addition to organizing your project into a sensible structure, Strange offers the following benefits:
- Designed to play well with Unity3D. Also designed to play well without it.
- Separate UnityEngine code from the rest of your app.
- Improves portability
- Improves unit testability
- A common event bus makes information flow easy and highly decoupled. (Note: Unity’s SendMessage method does this, of course, but it’s dangerous as all get-out. I may write a whole article on just this topic at some point.)
- The extensible binder really is amazing (a friend used to tell me “it’s good to like your own cookin’!”). The number of things you can accomplish with the tiny core framework would justify Strange all on its own.
- Multiple contexts allow you to “bootstrap” subcomponents so they operate fine either on their own or as an integrated part. This can hugely speed up your development process and allow developers to work in isolation, then integrate in later stages of development.
Acknowledgements
It is hard to adequately credit the creators of the open source Actionscript framework Robotlegs for their influence on the creation of StrangeIoC. While Strange is not a port of Robotlegs, the ensigns of that library are copiously reflected throughout this one. For their great service to my professional development, I offer that team my sincerest thanks. And a donut. Seriously, if you’re ever in town, let me buy you a donut.
Kudos to Will Corwin for contributing the awesome Signals implementation (and implicit bindings, now on the dev branch).
I also need to thank and congratulate the folks at ThirdMotion who inexplicably gave me time to build Strange and license to open source it.
Glossary
This document uses lots of words which have lots of meaning to engineers...but little to non-engineers...and sometimes not that much to engineers who come from different backgrounds. If you run across a word you don't understand never fear! Check out this glossary to see if we've explained it there.
Introduction: the directories
The downloaded project contains everything you need to get going, including a few example scenes. To find the code, which is most of what we’re going to discuss, look inside StrangeIoC > scripts > strange. You’ll find three subdirectories (if you’re looking from inside Unity, you’ll only see two).
- framework - The handful of classes that make Strange what it is
- extensions - Various libraries that build upon the core framework to provide useful functionality
examples - Code for the example projects(examples moved toStrangeIoC > examples).- .tests - Contains unit tests to validate that the framework and extensions work properly
1. Binding
The core of Strange is a very simple package for binding. This means, essentially, that we can bind (connect) one or more of anything to one or more of anything else. Tie an interface to a class that implements that interface. Or tie an event to a handler. Or tie two classes such that when one comes into being, the other one is automatically created. Why would we do this? So glad you asked! It turns out that much of what we do when programming comes down to binding. If you’ve ever dispatched an event (or a SendMessage in Unity), if you’ve ever indicated that one class uses another class, if you’ve ever written so much as an “if...else” statement, you’ve engaged in some form of binding. That is, you’ve tied something to something else.
But binding things directly is problematic, because it results in code that’s hard to change (rigid) and easy to break (brittle). For example, I’m sure you’ve programmed something in which you’ve expressed the idea “this is a Thing. And a Thing contains these other SubThings.” For example, a Spaceship class, which contains both a Gun and a keyboard control. You write this — and all’s well-and-good, until your boss says he wants mouse control instead of keyboard. So now you go back and re-write the Spaceship class. But wait a second. Your Spaceship class didn’t really change any. It’s the control that changed. So why are you re-writing Spaceship?
Instead of writing the controls right into the Spaceship class, you could create a MouseControl Class and use that. But if Spaceship includes a reference to the MouseControl class, you’re still directly binding. In order to change from KeyboardControl to MouseControl (and back again, when your boss changes his mind), you have to change the reference inside Spaceship.
Strange’s binders make it possible to create indirect bindings that relieve your code’s reliance on other parts of the program. This is a fundamental (but often misunderstood) tenet of Object-Oriented Programming. Your code isn’t really Object-Oriented until the objects themselves can function without reliance on other concrete classes. Using binders can give your code lots more freedom and flexibility.
The structure of a binding
Let’s look quickly at the structure of a single binding. This structure is repeated throughout Strange and all its extensions, so you’ll want to understand the pattern.
A Strange binding is made up of two required parts and one optional part. The required parts are a key and a value. The key triggers the value; thus an event can be the key that triggers a callback. Or the instantiation of one class can be the key that leads to the instantiation of another class. The optional part is a name. Under some circumstances, it is useful to qualify two bindings with identical keys. Under these circumstances, the name serves as a discriminator.
All three of these parts can be structured in one of two ways, either as a value or as a type using C# generics. Using generics, for example we might say:
Bind<Spaceship>().To<Liberator>();
The “Bind” is the key, the “To” is the value. We might express the binding as a value:
Bind(“MeaningOfLife”).To(42);
A binder fed with the input “MeaningOfLife” would react with the output 42.
There are times when these two styles get mixed:
Bind<Spaceship>().To(“Enterprise”);
When this binder is fed with the Type Spaceship, it outputs the string value “Enterprise”.
When naming is called for, the binding looks much the same:
Bind<IComputer>().To<SuperComputer>().ToName(“DeepThought”);
Finally, note that the following things are all the same:
Bind<IDrive>().To<WarpDrive>();

Bind(typeof(IDrive)).To(typeof(WarpDrive));

IBinding binding = Bind<IDrive>();
binding.To<WarpDrive>();
The differences are nothing more than syntactical sugar.
There are countless forms of binding, and Strange gives you access to a few really useful ones. What’s more, the binding framework is so simple that you can extend it yourself to create new binder components. We go into each of the included binders in the following section.
2. Extensions
You may have heard that Strange is a Dependency Injection framework. I'm a little uncomfortable with that description. Sure, Strange offers DI and it's a great use, but the core of the framework — as I've said — is binding. The installation comes with several useful extensions of the core Binder, which I'm going to detail in this section. Remember, though, that nothing stops you from extending the Binder to create your own custom implementations.
Note: in the sections that follow, I regularly refer to the MVCSContext version of Strange. MVCSContext is the recommended version, which includes all the extensions mentioned below. It’s the easiest way to get started with Strange.
The injection extension
The Binder extension most closely related to Inversion-of-Control (IoC) is the injector package. We hinted at injection a bit in the prior section, now let's get into the particulars.
You may be familiar with the idea of writing Interfaces. An Interface contains no implementation itself, it just defines what a class’s inputs and outputs look like. In C# this looks like:
interface ISpaceship
{
	void input(float angle, float velocity);
	IWeapon weapon{get;set;}
}
And the class that implements the interface looks like:
class Spaceship : ISpaceship
{
	public void input(float angle, float velocity)
	{
    		//do stuff here
	}

	public IWeapon weapon{get;set;}
}
By programming to interfaces, we relieve some of the Thing-Contains-SubThings problem. Our Spaceship no longer needs to contain a keyboard listener, it simply needs a method to react to input. It no longer needs a Gun, just something (what we call a 'concrete' class) that satisfies the IWeapon interface. That's a big step forward.
But here's a question for you: who tells the Spaceship what type of IWeapon to use? Well, let's say the Spaceship will be in a GameField, so maybe the GameField could tell the Spaceship what weapon it would use? But that would mean that the GameField would need to know about the concrete class. All that does is shift the location of the dependency, so that's no good.
The GameField could have an interface that pushed all of its dependencies (including everything the Spaceship needs), and so on, right up to the top of the application.
TopOfApp > GameModule > GameField > Spaceship Phaser ---------------------------------------------------> |
That would remove the concrete classes, but it would also mean a long chain of dependency pushes through the entire class hierarchy. That's brittle, meaning that a change anywhere could break lots of things and be very hard to locate. It also means that the GameField (and any other classes in the chain) needs to know about IWeapon. But GameField probably doesn't care about IWeapon, so why create a dependency where none is needed?
How about a Factory pattern? If I create a SpaceshipFactory, a class that creates Spaceships and simply follows the IFactory interface, then the GameField needs only that one dependency. Now we're getting somewhere.
GameField ---------> SpaceshipFactory : IFactory ISpaceship <--------- (creates concrete Spaceship) |
No need to know about IWeapon, though I need to know about ISpaceship and now I need IFactory too. Hmmm, and probably IEnemy, come to think of it. And, yeah, I need to wire up all those factories and figure out how they’re being provided. So not bad (and this is as far as many programmers get). But you can see that even this well-regarded pattern has significant weaknesses.
So consider a completely different model, one where no class ever has to fulfill another class’s dependencies explicitly. This model is called Dependency Injection (DI). In DI, a class requests what it needs (ideally in the form of an Interface) and a class called an Injector provides that need. Most traditionally, this is accomplished by means of a mechanism called Reflection.
With DI, if GameField needs an ISpaceship, it sets up a dependency that looks like this:
ISpaceship <--------- (as if by magic) |
There’s no reliance on dependency chains or factories. There are no dependencies except the ones your class actually needs. And you never need to make the dependency explicit (though of course you can choose to do so).
So how’s the “magic” work?
C#’s System.Reflection package allows a class to be deconstructed at runtime and analyzed. It’s worth noting that this isn’t the fastest process, so we use it sparingly in Strange, and so should you. When reflecting a class, we can examine its methods and properties. We can see what its construction methods look like and what parameters they require. By examining all these clues we can deduce what a class’s dependencies look like, then provide them.
The code for setting up a dependency in Strange usually looks like this:
[Inject]
public IInterface myInstance {get;set;}
And how does Strange know what concrete class to provide for IInterface? You tell it by binding dependencies in a central file called the Context. As I’ve mentioned, the “standard” Context is MVCSContext, which is a class you can extend to get all of Strange’s wacky goodness. When extending MVCSContext, you can create your bindings right in the extended class like so:
injectionBinder.Bind<IWeapon>().To<PhaserGun>();
Now, whenever a class requires an IWeapon, the concrete class PhaserGun is provided. If you decide to change PhaserGun to SquirtCannon, you make no changes whatsoever to Spaceship or to any other class. You simple remap:
injectionBinder.Bind<IWeapon>().To<SquirtCannon>();
Hey presto! The Spaceship now uses a SquirtCannon. All this from simply a one-word acknowledgement that this is a dependency to be injected:
class Spaceship : ISpaceship
{
    public void input(float angle, float velocity)
    {
    	//do stuff here
    }

    [Inject] //<----- The magic word!
    public IWeapon weapon{get;set;}
}
It might be of interest to note that this [Inject] attribute tag is entirely innocuous if you’re not using DI. So you can add it to your classes and then, if you someday decide this DI lark is all some terrible mistake (which it most emphatically is not), the tags in your code will make no difference to you whatsoever. Without that [Inject] tag, 'weapon' is now just a regular ol' getter/setter.
Instantiating injectable instances
Now there is one big “take note” in all this. If you want all this injectable goodness, you need to do two things:
- Bind classes in the Context, which we’ve discussed, and
- Instantiate instances from the InjectionBinder
The second one feels unusual at first, but it’s really very straightforward. It’s just like a factory, only instead of oen factory for every Type, we just go to the Injector for everything. Also, most of the time the InjectionBinder is entirely invisible. Most of us are used to constructing through constructors...
IClass myInstance = new MyClass();
...so this takes a little retraining. Let me re-emphasize, most of the time you’ll not need to use this method, since your instances will come via injection. You only need what I’m about to tell you in those cases where you’d otherwise be inclined to write new MyClass().
IClass myInstance = injectionBinder.GetInstance<IClass>() as IClass;
As you can see, we’re still freeing ourselves from the tyranny of concrete classes. And the instance you get will come pre-injected with all its dependencies. It’s just a little different from what you’re used to.
Types of injection mapping
So we can bind injections in lots of ways, and they’re all useful. One of the most useful bindings is ToSingleton. It looks like this:
injectionBinder.Bind<ISocialService>().To<TwitterService>().ToSingleton();
A Singleton is a design pattern you probably know. It indicates that there will only ever be one of something in an app. If you use this pattern, you might have seen a line like this:
ISocialService socialService = TwitterService.Get();
There are some problems with Singletons, most notably that sometimes they turn out to not be so singular. In the above line, for example, it may turn out that there’s only one ISocialService (Twitter) one day, but due to a design change, there are three (Twitter, Facebook and G+) tomorrow. The writer of TwitterService.Get() is not only concretely relying on TwitterService, she’s explicitly stating that she knows it’s a Singleton. If that changes, she’s got refactoring to do.
Compare this to the Singleton “Get” in Strange:
[Inject]
public ISocialService {get;set;}
Oh wait, that can’t be right. That looks exactly the same as the injection tag we saw before. Yep. That’s the point. Your class doesn’t need a TwitterService, it needs an ISocialService. And it certainly doesn’t care whether that service is a Singleton or not.
Because Strange’s dependency is only a mapping, it becomes a trivial matter in Strange to re-map our Singleton to a different service. Not only doesn’t the client have any idea which ISocialService it is, it has no idea whether the service is a Singleton or anything else. That’s as it should be. Once you start using DI, you will never write a Singleton again. You will map Singletons.
But in my example we’re not just changing services, we’re adding multiple services. So how do we tell them apart? This brings us to the second type of mapping: named injections.
injectionBinder.Bind<ISocialService>()
	.To<TwitterService>().ToSingleton()
	.ToName(ServiceTypes.PRIMARY);

injectionBinder.Bind<ISocialService>()
	.To<TwitterService>().ToSingleton()
	.ToName(ServiceTypes.SECONDARY);

injectionBinder.Bind<ISocialService>()
	.To<TwitterService>().ToSingleton()
	.ToName(ServiceTypes.TERTIARY);
Named injections are a tiny bit different from other injections. The name allows the injector to discriminate between different classes that satisfy the same Interface. In this way, you can inject ISocialService in different places and get the specific version you want. The client class needs the matching name added to the [Inject] tag:
[Inject (ServiceTypes.TERTIARY)] //We mapped TwitterService to TERTIARY
public ISocialService socialService{get;set;}
Names can be anything, but in practice an Enum is usually a good choice. Note that this name-tagging in your classes creates a dependency of sorts (we are, after all, stating that the client expects something more than just a generic interface), so we suggest using this feature sparingly.
Sometimes you know exactly what you want to inject. Perhaps you’ve loaded a config file and you need that available in different areas around the application. This is accomplished by value mapping.
Configuration myConfig = loadConfiguration();
injectionBinder.Bind<IConfig>().ToValue(myConfig);
In the example, myConfig would be the result of loading some configuration file. Now wherever you need an IConfig, you’ll receive the value myConfig. Again, note that the client class has no idea whatsoever whether this is a Singleton, a value, or whatever. Its job is to use IConfig, not to wonder where it comes from.
You might also come across a situation where you have no control over a class. Perhaps it comes from a package you’ve downloaded and has already been written as a Singleton. You can still accomplish mapping with ToValue. Just call the Singleton's Get() (perhaps in the Context) and map the result:
TouchCommander instance = TouchCommander.Get();
injectionBinder.Bind<TouchCommander>().ToValue(instance);
It would of course be better to bind it to an Interface if TouchCommander adheres to one. Or (and I do this a lot), you can create an interface and wrap TouchCommander inside a facade. After all, you might someday decide to change from TouchCommander to some other touch handling system. If you did that and had TouchCommander references throughout your app, you'd again be faced with a lot of refactoring. A facade class that adheres to an interface of your choosing saves you from this problem and keeps concrete references to TouchCommander tightly controlled.
Now what about if you need a new instance every time you ask for one? We accomplish this with what’s called a factory mapping:
injectionBinder.Bind<IEnemy>().To<Borg>();
This is basically the same as the ToSingleton mapping, just without the instruction ToSingleton. Whenever this injection is satisfied, you’ll get a new IEnemy, in this case mapped to the concrete class Borg. Note that we can combine these mappings so that, for example, a factory mapping can also be named:
injectionBinder.Bind<IEnemy>().To<Borg>().ToName(EnemyType.ADVANCED);
injectionBinder.Bind<IEnemy>().To<Romulan>().ToName(EnemyType.BASIC);
You can also bind multiple times, allowing a binding to be polymorphous, which is a fancy-pants way of saying that a class can have more than one interface:
injectionBinder.Bind<IHittable>().Bind<IUpdateable>().To<Romulan>();
This would allow you to get an enemy regardless whether the [Inject] tag was marked IHittable or IUpdateable. Note that while multiple 'Bind's make sense, in this context multiple 'To's do not. You can map to any of multiple Interfaces, but injection only makes sense if the result is a single concrete type or value.
Some things you can do with Injectable Classes
I’ve already mentioned how you declare injection setters in your classes. To recap, to make a property injectable, use the [Inject] attribute:
[Inject]
public ICompensator compensator{get;set;}
Or, to make it a named injection:
[Inject(CompensatorTypes.HEISENBERG)]
public ICompensator compensator{get;set;}
or, to mark it with a marker class:
[Inject(typeof(HeisenbergMarker))]
public ICompensator compensator{get;set;}
These are all examples of setter injection, which is one of two types of injection available in Strange. The other type of injection is constructor injection, in which your injections are provided as part of the actual call to the class’s constructor. There are two notable disadvantage to setter injection. First, injecting requires making the injectable properties public. This may or may not be what you would have chosen were you not injecting. With constructor injection you can keep the private values private. Second, you have to be careful in your actual constructors if you’re using setter injection. By definition, construction has to occur before setters are set. Thus any injected properties will be unavailable until after construction. Because constructor injection provides the dependencies as constructor parameters, all values are available immediately.
Type of Injection |
Advantages |
Disadvantages |
Setter |
|
|
Constructor |
|
|
In addition to [Inject] there are a couple of other attributes you should know about.
If your class has multiple constructors, the [Construct] tag is a way to mark which one you want Strange to use. If no constructor is marked with [Construct], Strange chooses the constructor with the fewest parameters. Of course, if you have only one constructor, you needn’t use the [Construct] attribute at all.
public Spaceship()
{
	//This constructor gets called by default...
}

[Construct]
public Spaceship(IWeapon weapon)
{
	//...but this one is marked, so Strange will call it instead
}
[PostConstruct] is a useful attribute if you choose to go with setter injection. Any method marked with [PostConstruct] is called immediately following injection. This allows you to work with any injections as soon as they’re ready, safe in the knowledge that the dependencies won’t return a null pointer.
[PostConstruct]
public void PostConstruct()
{
	//Do stuff you’d normally do in a constructor
}
You can have as many [PostConstruct] methods as you like, and they can be ordered (as of v0.7).
[PostConstruct(1)]
public void PostConstructOne()
{
	//This fires first
}

[PostConstruct(2)]
public void PostConstructTwo()
{
	//This fires second
}
Should you use setter injection or constructor injection? Shaun Smith, one of the authors of Robotlegs, has an excellent post on the subject here.
Warnings
There are a couple of potential gotchas to beware of with injection.
1. Be careful of dependency loops. If classes inject each other, this can lead to a never-ending dependency loop. Strange armors against this to avoid bringing down your app (and will throw an InjectionException to alert you), but you should avoid doing it in the first place.
2. Injection employs reflection, which, as I’ve noted, is slow. Strange uses ReflectionBinder to minimize this problem (and delivers very formidable results), but consider carefully whether this method is appropriate for performance-sensitive code, such as your main game loop.
3. It might be obvious to say, but remember that if you inject something, you have to map it. Creating dependencies then forgetting to fulfill them results in null pointer errors. Fortunately, Strange looks for these and does its level best to help you figure out what you forgot to map and who needs it.
The reflector extension
Honestly, you don’t need to know too much about this extension, except that it’s there and that it handles Reflection during injection. Reflection is the process of analyzing classes at runtime. Strange uses this process to determine what to inject.
(It’s probably worth noting that the reflector extension was written late in development as an optimization for the slow process of Reflection. I felt that Reflection performance could be improved if I cached the result of reflecting, so I wrote ReflectionBinder to do just that. Before the reflector, every class went through Reflection every time time it was instantiated. Now it goes through that process just once per class. The result was an estimated 5x improvement over 1000 moderately complex instances. It’s a great example of extending the core Binder to solve a problem.)
One feature that might be worth your notice is the ability to “pre-reflect” classes. That is, you can trigger the expensive process of reflection at a moment when processing requirements are minimal (say, while the player is looking at some static UI). This is accessed via the injectionBinder.
The first example demonstrates how to reflect a list of classes:
List<Type> list = new List<Type> ();
list.Add (typeof(Borg));
list.Add (typeof(DeathStar));
list.Add (typeof(Galactus));
list.Add (typeof(Berserker));
//count should equal 4, verifying that all four classes were reflected.
int count = injectionBinder.Reflect (list);
The second example simply reflects everything already mapped to the injectionBinder;
injectionBinder.ReflectAll();
The dispatcher extension
NB: EventDispatcher is the original and default dispatch system for Strange. There is now a Signals extension which adds type-safety to your dispatches. We recommend the new system, but plan to support both for the foreseeable future. Which package you use is up to you.
In principle, a dispatcher is any class that functions as the 'subject' in a classic Observer Pattern. That is, it allows clients to listen to it, and then tells those clients whenever certain events occur. In Strange, we've implemented the EventDispatcher, which binds a trigger (which can be anything, but a string or Enum usually does the trick) to single-parameter or no-parameter methods which will react when that trigger fires. The resulting parameter (if required) will be in the form of an IEvent, a simple value object which contains any data relevant to that event (while you can write your own event that satisfies the IEvent interface, the canonical Strange event is called TmEvent).
If you're using the MVCSContext version of Strange, there's a global EventDispatcher (dubbed ‘contextDispatcher’) automatically injected at various points around the app and you can use that to send messages throughout your app. There's also a crossContextDispatcher for communicating between Contexts.
There are two basic things you can do with EventDipatcher: dispatch events and listen to them. That said, there are quite a few ways to configure just how those events are sent and received. Let’s start with the simplest form of listening.
dispatcher.AddListener("FIRE_MISSILE", onMissileFire);
This will listen to the dispatcher until an event called "FIRE_MISSILE" is dispatched, at which point a method called onMissileFire will be triggered.
Let me suggest that while this is simple, it's not very good. Strings make code brittle, that is, they make code that breaks easily. A string in one place can change without the rest of the code knowing, and that's a recipe for disaster. A better form of the same thing would be a const...perhaps an Enum:
dispatcher.AddListener(AttackEvent.FIRE_MISSILE, onMissileFire);
You can remove the listener like so:
dispatcher.RemoveListener(AttackEvent.FIRE_MISSILE, onMissileFire);
Under the hood, AddListener and RemoveListener are just synonyms for Bind and Unbind. The AddListener/RemoveListener pair is just syntactic sugar to provide an interface with which many people are familiar. There’s also a convenience method for updating the listener based on a boolean:
dispatcher.UpdateListener(true, AttackEvent.FIRE_MISSILE, onMissileFire);
The method called can either have one argument or none, depending on whether you care about any event payload:
private void onMissileFire()
{
	//this works...
}

private void onMissileFire(IEvent evt)
{
	//...and so does this.
	Vector3 direction = evt.data as Vector3;
}
You’ll also want to be able to dispatch events. This is how you say "Look over here! I'm doing something cool!" There are a few ways to do this. Again, starting simple:
dispatcher.Dispatch(AttackEvent.FIRE_MISSILE);
This form of dispatch will generate a new TmEvent and call any listeners, but since you’ve provided no data, the data field of the TmEvent will of course be null. You can also call Dispatch and provide data:
Vector3 orientation = gameObject.transform.localRotation.eulerAngles;
dispatcher.Dispatch(AttackEvent.FIRE_MISSILE, orientation);
Now the TmEvent created will have Vector3 data that matches orientation.
Finally, you can actually create the TmEvent explicitly and dispatch that:
TmEvent evt = new TmEvent(AttackEvent.FIRE_MISSILE, dispatcher, this.orientation);
dispatcher.Dispatch(evt);
Which version of Dispatch you use is largely a stylistic choice. Every version looks the same to a listener.
The command extension
In addition to binding events to methods, you can bind them to Commands. Commands are the Controllers in the classic Model-View-Controller-Service structure. In the MVCSContext version of Strange, the CommandBinder listens to every dispatch from the dispatcher (of course you can change this if you want in your own Context). Signals, described below, can also be bound to Commands. Whenever an event or Signal fires, the CommandBinder determines whether that event or Signal is bound to one or more Commands. If CommandBinder finds a binding, a new Command instance is instantiated. The Command is injected, executed, then disposed of. Let’s start by looking at a simple Command:
using strange.extensions.command.impl;
using com.example.spacebattle.utils;

namespace com.example.spacebattle.controller
{
	class StartGameCommand : EventCommand
	{
		[Inject]
		public ITimer gameTimer{get;set;}

		override public void Execute()
		{
			gameTimer.start();
			dispatcher.dispatch(GameEvent.STARTED);
		}
	}
}
There are several things to note about this simple example. First, observe that we’re using the strange.extensions.command.impl namespace since this Command extends EventCommand. You don’t have to extend EventCommand or even Command, but your commands do have to adhere to the ICommand interface. Second, note that you can inject into commands. This is really useful, since it means that any model or service can be accessed and interacted with. Finally notice that by extending EventCommand we automatically have access to dispatcher (the EventDispatcher injected everywhere within a Context), so any listener to contextDispatcher, anywhere in the app, can hear that GameEvent.STARTED we just fired. Since this is a synchronous Command, we simply fire and forget. As soon as Execute() completes, the Command will get cleaned up.
But what about asynchronous Commands, like calling on a web service? We can handle these with a really simple pair of methods called Retain() and Release(). Look at this:
using strange.extensions.command.impl;
using com.example.spacebattle.service;

namespace com.example.spacebattle.controller
{
	class PostScoreCommand : EventCommand
	{
		[Inject]
		IServer gameServer{get;set;}

		override public void Execute()
		{
			Retain();
			int score = (int)evt.data;
			gameServer.dispatcher.AddListener(ServerEvent.SUCCESS, onSuccess);
			gameServer.dispatcher.AddListener(ServerEvent.FAILURE, onFailure);
			gameServer.send(score);
		}

		private void onSuccess()
		{
			gameServer.dispatcher.RemoveListener(ServerEvent.SUCCESS, onSuccess);
			gameServer.dispatcher.RemoveListener(ServerEvent.FAILURE, onFailure);
			//...do something to report success...
			Release();
		}

		private void onFailure(object payload)
		{
			gameServer.dispatcher.RemoveListener(ServerEvent.SUCCESS, onSuccess);
			gameServer.dispatcher.RemoveListener(
			ServerEvent.FAILURE, onFailure);
			//...do something to report failure...
			Release();
		}
	}
}
You can probably understand pretty much everything happening here. We pass off the SendScore request to the gameServer, which chews on it for awhile. The Command will hang around while the server does what it needs to do. By calling Retain() at the top of the Execute method, we keep the command in memory. Whenever you call Retain(), it is critically important that you call Release(), however the callback turns out. Failure to do so will result in a memory leak.
Mapping commands
Although technically we can map Commands to events almost anywhere, we typically do so in the Context. Doing so makes it easy to locate when you (or anyone else) needs to find what’s mapped to what. Command mapping looks a lot like injection mapping:
commandBinder.Bind(ServerEvent.POST_SCORE).To<PostScoreCommand>();
You can bind multiple Commands to a single event if you like:
commandBinder.Bind(GameEvent.HIT).To<DestroyEnemyCommand>().To<UpdateScoreCommand>();
And you can unbind at any time to remove a binding:
commandBinder.Unbind(ServerEvent.POST_SCORE);
There’s also a nice “one-off” directive for those times where you only want a Command to fire just the next time an event occurs.
commandBinder.Bind(GameEvent.HIT).To<DestroyEnemyCommand>().Once();
By declaring Once, you ensure that the binding will be destroyed the next time the Command fires.
Sequences are a group of commands fired in order. The commands fire one-by-one either until the sequence reaches the end, or one of the commands fails. A command can call Fail() at any point, which breaks the sequence. This can be useful for setting up a chain of dependent events, for building ordered animations, or for setting a guard to determine whether or not a Command should really execute.
Mapping a sequence simply requires the addition of the InSequence() instruction:
commandBinder.Bind(GameEvent.HIT).InSequence()
	.To<CheckLevelClearedCommand>()
	.To<EndLevelCommand>()
	.To<GameOverCommand>();
The idea behind this sequence is that a hit might indicate that a level has been cleared. So we run the CheckLevelClearedCommand. If it passes, we run EndLevelCommand. If that Command indicates we’ve reached the final level, run the GameOverCommand. Commands in a sequence execute successively, so at any point along the way, a Command can simply call Fail() to stop the execution flow.
As with regular Commands, commands in a sequence may execute asynchronously. If they do (and presuming Fail() isn’t called), the subsequent Command will be fired as soon as Release() is invoked.
The signal extension
Signals are a dispatch mechanism — an alternative to EventDispatcher — introduced with Strange v.0.6.0. Whereas EventDispatcher creates and dispatches IEvent objects with a single data property, Signals hook to callbacks, passing 0-4 strongly-typed arguments. This has two major advantages over the EventDispatcher. First, Signal dispatch results in no new object creation, and therefore no need to GC a lot of created instances. Second, and far more importantly, Signal dispatches are type-safe and will break at compile-time if the Signals and their mapped callbacks don't match.
Another important distinction is that while there is a single 'global' EventDispatcher for each context (and another 'even-more-global' CrossContextDispatcher) firing off Event triggers, Signals uses a different model. Each 'Event' is the result of an individual Signal tasked to some duty. So while EventDispatcher is monolithic, there may be any number of Signals. Let's show some examples.
Here are two Signals, each with one parameter:
Signal<int> signalDispatchesInt = new Signal<int>();
Signal<string> signalDispatchesString = new Signal<string>();
Notice how the dispatch type of each Signal has been baked right into the instantiation. Let's build this out with some callbacks:
Signal<int> signalDispatchesInt = new Signal<int>();
Signal<string> signalDispatchesString = new Signal<string>();

signalDispatchesInt.AddListener(callbackInt);		//Add a callback with an int parameter
signalDispatchesString.AddListener(callbackString);	//Add a callback with a string parameter

signalDispatchesInt.Dispatch(42);			//dispatch an int
signalDispatchesString.Dispatch("Ender Wiggin");	//dispatch a string

void callbackInt(int value)
{
	//Do something with this int
}

void callback(string value)
{
	//Do something with this string
}
What's worth noticing here is that once the Signal bakes in its type, that type is a compile-time requirement of any listener to that Signal. This means the app simply won't compile if, for example, you accidentally do this:
Signal<int> signalDispatchesInt = new Signal<int>();
Signal<string> signalDispatchesString = new Signal<string>();

signalDispatchesInt.AddListener(callbackString); //Oops! I attached the wrong callback to my Signal!
signalDispatchesString.AddListener(callbackInt); //Oops! I did it again! (Am I klutzy or what?!)
This makes screwing up your listeners pretty darned difficult.
The parameters of a Signal are type-safe and down-castable. This means that anything assignable from the parameter's Type is a legal mapping.
//You can do this...
Signal<SuperClass> signal = new Signal<SuperClass>();
signal.Dispatch(instanceOfASubclass);

//...but never this
Signal<SubClass> signal = new Signal<SubClass>();
signal.Dispatch(instanceOfASuperclass);
You can write Signals with 0-4 parameters. Signals use the Action Class as the underlying mechanism for type safety. Unity's C# implementation allows a maximum of four parameters to an Action, so that's as far as we can take you. If you require more than four parameters, consider creating a value object and sending that instead.
//works
Signal signal0 = new Signal();

//works
Signal<SomeValueObject> signal1 = new Signal<SomeValueObject>();

//works
Signal<int, string> signal2 = new Signal<int, string>();

//works
Signal<int, int, int> signal3 = new Signal<int, int, int>();

//works
Signal<SomeValueObject, int, string, MonoBehaviour> signal4 = new Signal<SomeValueObject, int, string, MonoBehaviour>();

//FAILS!!!! Too many params.
Signal<int, string, float, Vector2, Rect> signal5 = new Signal<int, string, float, Vector2, Rect>();
You can write your own Signal subclasses, of course, instead of declaring them like the inline examples above. This is especially useful in Strange, where you probably want to have some handy, human-readable names for mapping Signals within and between Contexts. Here's an example of a Signal subclass:
using System;
    using UnityEngine;
    using strange.extensions.signal.impl;

    namespace mynamespace
    {
        //We're typing this Signal's payloads to MonoBehaviour and int
        public class ShipDestroyedSignal : Signal<MonoBehaviour, int>
        {
        }
    }
Mapping Signals to Commands
If you want your Context to be able to bind Signals to Commands (a very good idea) you need to make one small plumbing change. If you'd rather get the full Signals experience, then add this to your Context:
protected override void addCoreComponents()
{
	base.addCoreComponents();
	injectionBinder.Unbind<ICommandBinder>();
	injectionBinder.Bind<ICommandBinder>().To<SignalCommandBinder>().ToSingleton();
}
Doing this informs Strange that we're doing away with the default CommandBinder and replacing it with the SignalCommandBinder. Thus Signals, rather than Events, will trigger Commands. Note that Strange currently supports eitherEvents or Signals mapped to Commands, but not both.
Having done this, Signals can now be mapped to Commands much as Events can. The basic syntax is:
commandBinder.Bind<SomeSignal>().To<SomeCommand>();
Note that it's still commandBinder. We simply unmapped the one that worked with EventDispatcher and hooked it up to a new one that works with Signals. Of course the full range of Command-mapping behavior is supported, including multiple Commands, sequences and mapping Once().
Mapping a Signal to a Command automatically creates an injection mapping which you can retrieve with the [Inject] tag, like so:
[Inject]
public ShipDestroyedSignal shipDestroyedSignal{get; set;}
Use this injection wherever necessary (always remembering to apply some common sense), including in Commands or Mediators.
To clarify how Signal/Command mapping works, let's briefly go through an example by mapping the ShipDestroyedSignal above to a Command. We'll start in the Context by binding the Signal:
commandBinder.Bind<ShipDestroyedSignal>().To<ShipDestroyedCommand>();
In a ShipMediator, we Inject the signal, then Dispatch it:
[Inject]
public ShipDestroyedSignal shipDestroyedSignal{get; set;}

private int basePointValue; //imagining that the Mediator holds a value for this ship

//Something happened that resulted in destruction
private void OnShipDestroyed()
{
	shipDestroyedSignal.Dispatch(view, basePointValue);
}
Dispatching a Signal mapped via the SignalCommandBinder results in the instantiation of a ShipDestroyedCommand:
using System;
using strange.extensions.command.impl;
using UnityEngine;

namespace mynamespace
{
	//Note how we extend Command, not EventCommand
	public class ShipDestroyedCommand : Command
	{
		[Inject]
		public MonoBehaviour view{ get; set;}

		[Inject]
		public int basePointValue{ get; set;}

		public override void Execute ()
		{
			//Do unspeakable things to the destroyed ship
		}
	}
}
As you can see, the methodology for mapping Signals to Commands is very similar to the methodology used with Events.
Two important caveats: first, while Signals support multiple parameters of the same Type, injections do not. It is therefore not possible for a Signal with two parameters of the same Type to be mapped to a Command.
//This works
Signal<int, int> twoIntSignal = new Signal<int, int>();
twoIntSignal.AddListener(twoIntCallback);

//This fails
Signal<int, int> twoIntSignal = new Signal<int, int>();
commandBinder.Bind(twoIntSignal).To<SomeCommand>();
Once again, this you can work around this limitation by mapping ValueObjects instead.
The second caveat: Strange has a handy-dandy, built-in START event for kicking things off. Unbinding the EventDispatcher turns this off. It is therefore the recommended practice to override your Context's Launch method with a custom StartSignal, like so:
override public void Launch()
{
	base.Launch();
	//Make sure you've mapped this to a StartCommand!
	StartSignal startSignal= (StartSignal)injectionBinder.GetInstance<StartSignal>();
	startSignal.Dispatch();
}
Mapping Signals without Commands
As mentioned above, mapping a Signal to a Command automatically creates a mapping which you can retrieve by injecting elsewhere, but what if you want to Inject a Signal without binding to a Command? In this case, simply map it using the injectionBinder, just like any other injected class:
injectionBinder.Bind<ShipDestroyedSignal>().ToSingleton();
The mediation extension
The MediationContext is the only part of Strange written exclusively for use with Unity3D. This is because mediation is all about carefully controlling how your views (GameObjects) interface with the rest of your app. Views are by nature highly volatile during development, and it's advisable to constrain that natural chaos to within the view classes themseves. For this reason, we suggest that your view consist of at least two distinct MonoBehaviours: View and Mediator.
View
The View class represents the 'V' in our MVCS structure. A View is a MonoBehaviour that you extend to write the behavior that controls the visual (and audible) input and output that a user sees. This class can be attached in the Unity3D IDE to the relevant GameObject. If it has public components, these can be tweaked right in the IDE as normal. Want a green button? Wire it up in the View. Want the green button to have a number on it? Wire that up in the View. Want to inject a model or service? WAIT! Don’t do that! Why?
While your Views are injectable, it’s almost always bad practice to tie your Views directly to models and services. As we’ve said, your View code is apt to get messy and it’s worth insulating your other classes from that mess. In the next chapter we’ll get into what we consider the best structure for app development with Strange, but for now just humor us and consider the idea that your View should only be responsible for the following:
- Wiring up the visual components.
- Dispatching events when the user interacts with those components.
- Exposing an api which allows another actor to change the visual state of those components.
By limiting yourself to those three functions, by keeping all logic or state out of your Views, by refusing to Inject models and services, you contain the View and make your life much, much better in the long run. Trust me on this. Please.
Now, in item ‘3’ above I mention exposing an api to another actor. Who might this actor be...?
Mediator
The Mediator class is a separate MonoBehaviour whose responsibility is to know about the View and about the app in general. It is a thin class, which means that its responsibilities should be very, very lean. It is allowed intimate knowledge of the View, is injectable and knows enough about the app to send and receive events or Signals. So think back to the number on the green button. You were going to inject a service into the View to display, say, the number of friends who are online. Well, you could inject the service into the Mediator, but since the Mediator is meant to be thin, a better answer would be to dispatch a request, let a Command handle the Service call, then dispatch a response. This is a lot of indirection, but the payoff for this indirection is clean, structured code.
Here’s how this might look in a Mediator:
using Strange.extensions.mediation.impl;
using com.example.spacebattle.events;
using com.example.spacebattle.model;
namespace com.example.spacebattle.view
{
	class DashboardMediator : EventMediator
	{
		[Inject]
		public DashboardView view{get;set;}

		override public void OnRegister()
		{
			view.init();
			dispatcher.AddListener
				(ServiceEvent.FULFILL_ONLINE_PLAYERS, onPlayers);
			dispatcher.Dispatch
				(ServiceEvent.REQUEST_ONLINE_PLAYERS);
		}

		override public void OnRemove()
		{
			dispatcher.RemoveListener
				(ServiceEvent.FULFILL_ONLINE_PLAYERS, onPlayers);
		}

		private void onPlayers(IEvent evt)
		{
			IPlayers[] playerList = evt.data as IPlayers[];
			view.updatePlayerCount(playerList.Length);
		}
	}
}
Some things to note here:
- The injection of DashboardView is how the Mediator knows about its View.
OnRegister()is the method that fires immediately after injection. It’s kind of like a constructor and you can use it to initialize the view and perform other setup processes, including — as we do here — request important data.- The contextDispatcher is injected into any Mediator that extends EventMediator, so you always have access to the context-wide event bus.
OnRemove()is for cleanup; it’s called just before a View is destroyed. Remember to remove any listeners you’ve added.- The View in this example has exposed an api of two methods: init() and updatePlayerCount(float value). In a real situation you’d probably expect a larger api, but the principle is the same: limit the Mediator to nothing but the thin task of relaying information between the View and the rest of the app.
Binding a View to a Mediator should look pretty familiar by now:
mediationBinder.Bind<DashboardView>().To<DashboardMediator>();
A couple of other points worth noting:
- Not any MonoBehaviour qualifies as a View. There’s a little behind-the-scenes magic going on to allow the View to inform Strange of its existence. So either extend View, or duplicate that magic in your own code (it’s only a few lines), or perhaps create a View of your very own which extends View and which your classes extend. This latter pattern is useful, since you might want to insert debugging code that will later be accessible to all your Views.
- Mediation binding is instance-to-instance. Whenever a new View comes into the world a new Mediator is created to support it. So lots of Views means lots of Mediators.
The context extension
The context package puts all your various Binders under one roof, so to speak. For example, the MVCSContext includes an EventDispatcher, an InjectionBinder, a MediationBinder, and a CommandBinder. You can, as we have discussed, remap the CommandBinder to a SignalCommandBinder. The (Signal)CommandBinder listens to the EventDispatcher (or Signals). Commands and Mediators rely on Injection. The Context is where we wire up these dependencies. To create a project, you'll override Context or MVCSContext and it's in this child class that you'll write all the bindings that make your application do what it does.
It is also possible — desirable even — to have multiple Contexts. This allows your app to be highly modular. Self-standing modules can run on their own, only interfacing with other modules as needed. Thus a core game can be written as one app, a social media component written separately, and a chat app as a third, and all three can be bound together late in development, each only sharing the pieces that the other components care about.
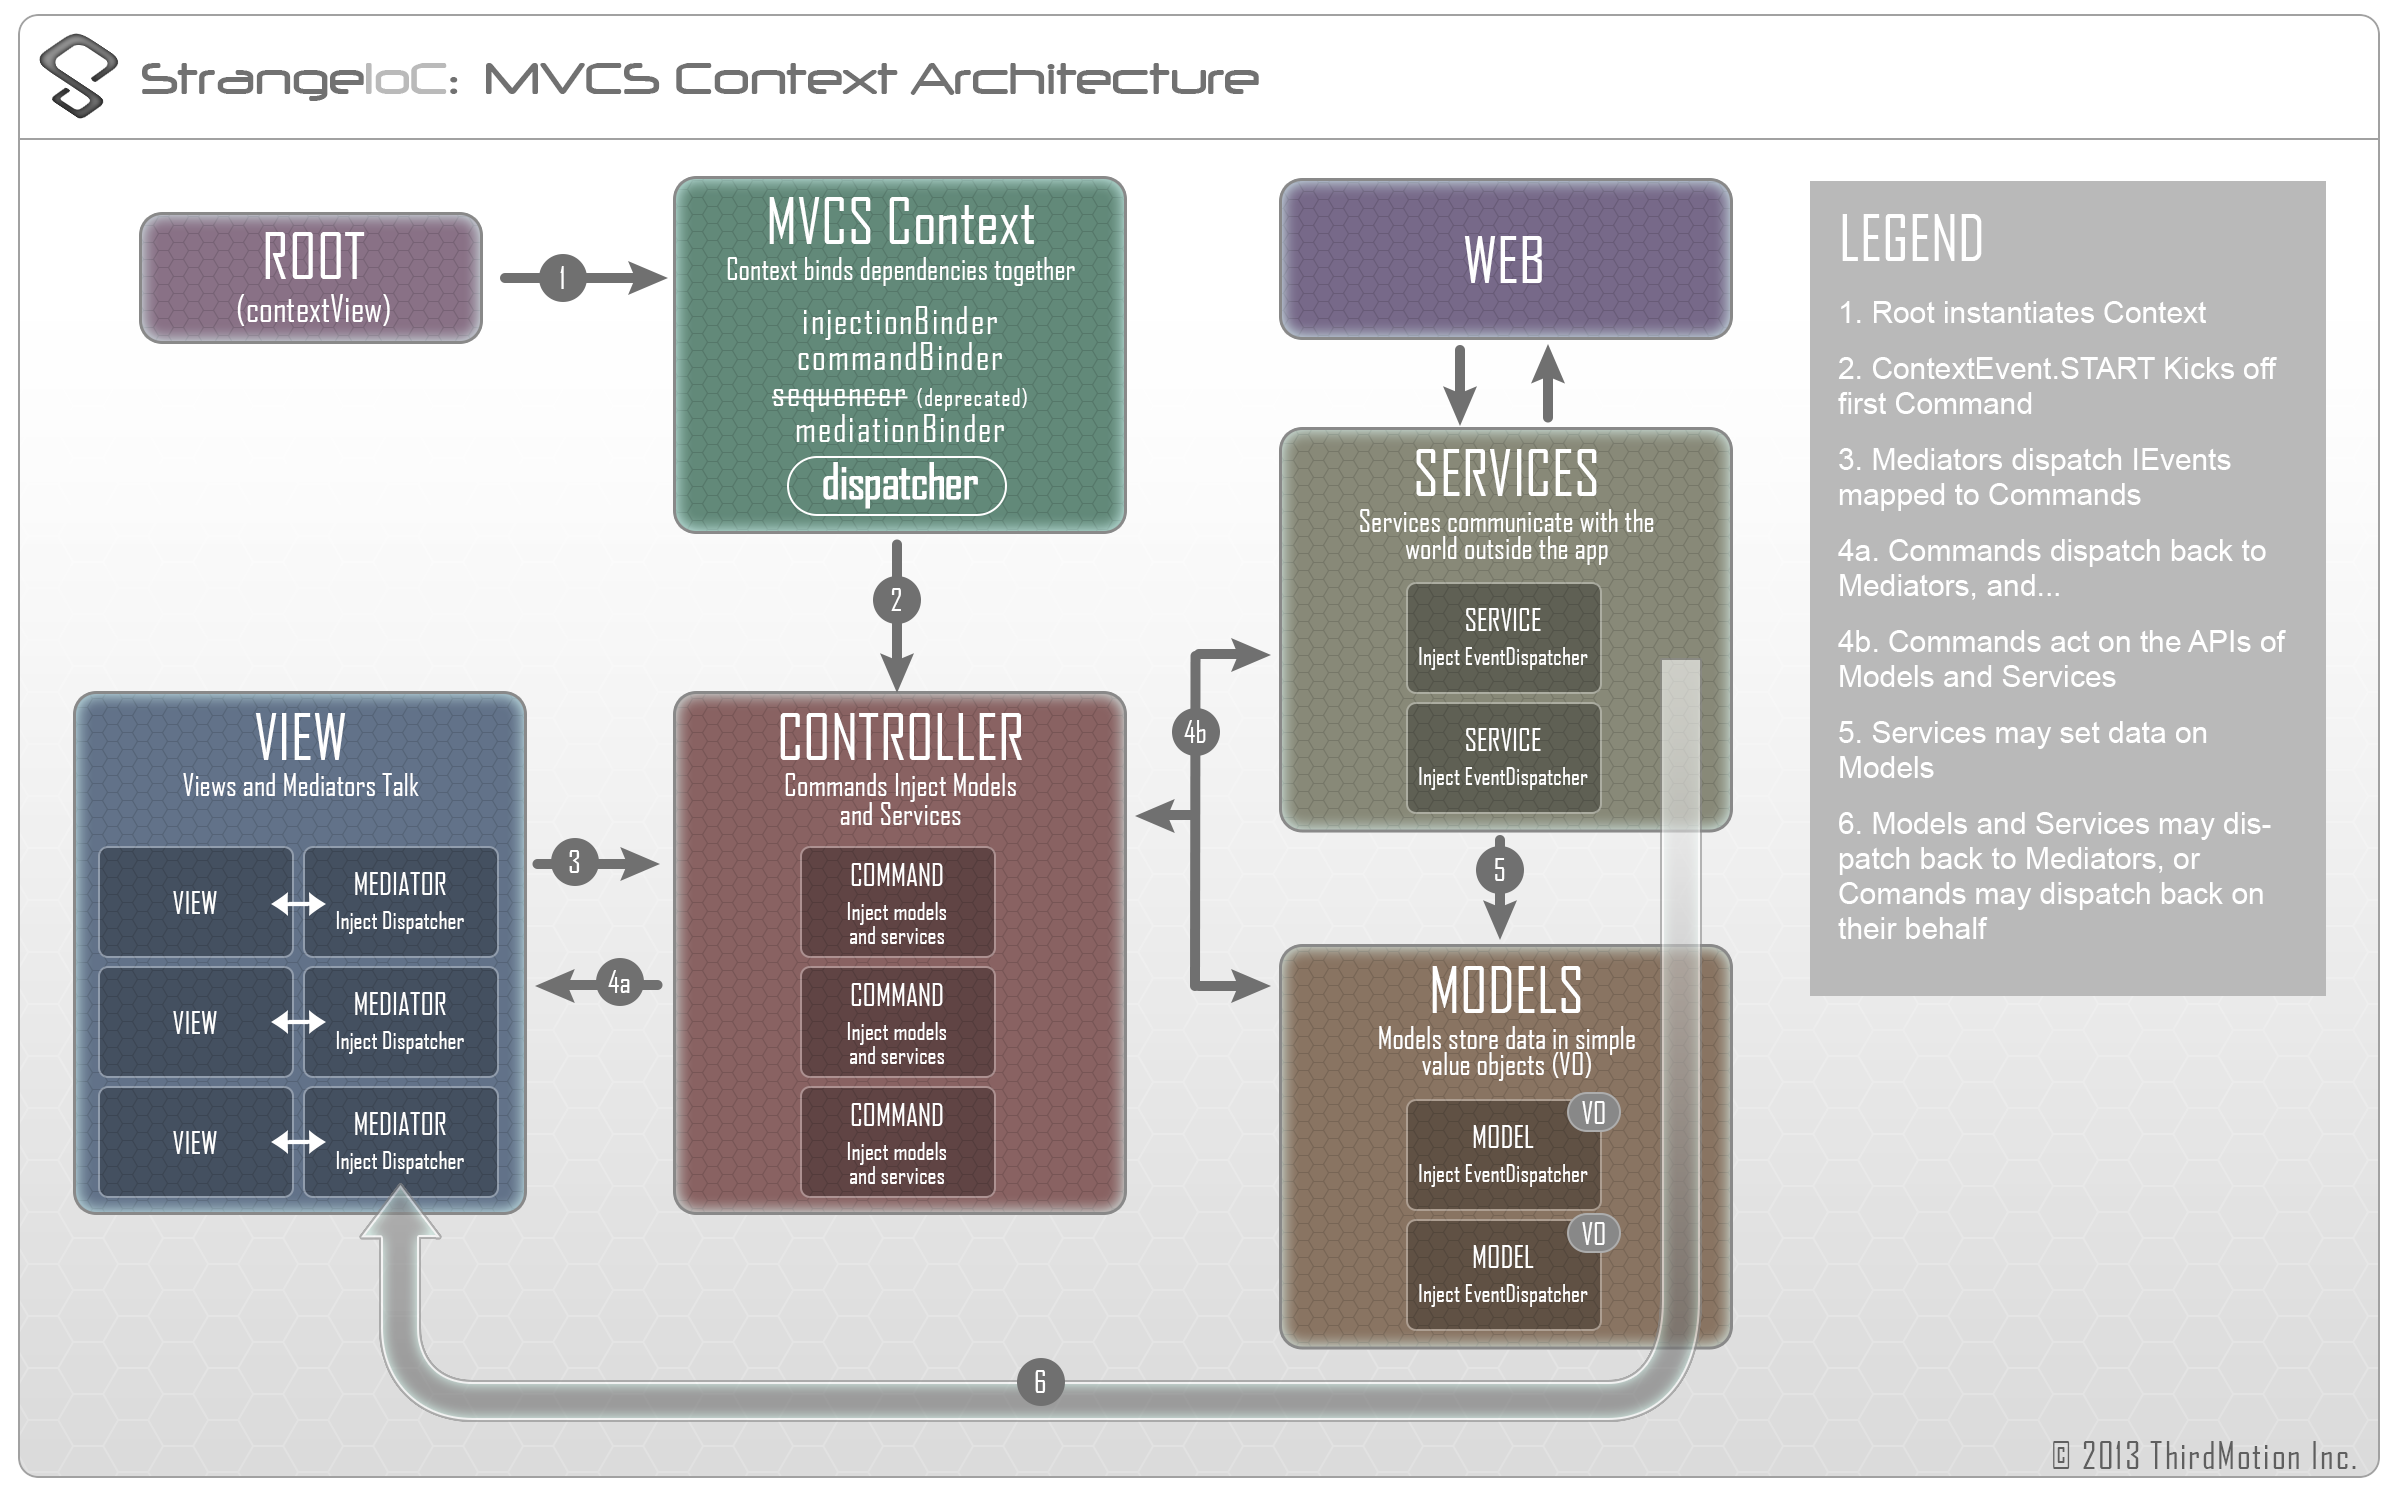
3. MVCSContext: the big picture
This section is basically a recipe for building a Strange app with MVCSContext. In the last section I described all the parts; in this one I’ll explain how to assemble them.
So you want to write a game. You’ve got Unity humming, MonoDevelop all warmed up and a cup of coffee in your hand (or whisky, if you're surfing the Ballmer Curve). Then someone says, “Hey, use Strange!” Now, she’s a smart cookie; she explains all the benefits and convinces you that you want to give it a go. Where to start?
Well, in the best vonTrapp tradition, let’s start at the very beginning.
Concepts
MVCSContext is Strange’s way of wrapping up the whole micro-architecture into a convenient, easy-to-use package. As the name suggests, it’s designed to work as an MVCS application (The ‘S’ is for Service, which refers to anything outside your application, such as a web service).
So here again are all the parts you’ll be assembling:
- The entry point to your app is a class called a ContextView, which is simply a MonoBehaviour that instantiates the MVCSContext.
- The MVCSContext (technically, a subclass of MVCSContext) is where you set up all your bindings (see Section 1, Binding).
- The dispatcher is a communication bus, allowing you to send messages throughout your app. The dispatcher used in MVCSContext sends objects called TmEvents. Alternatively, you can follow the steps outlined above to re-wire the Context to use Signals.
- Commands are classes triggered by IEvents or Signals. When a Command executes it carries out some part of the application logic.
- Models store state.
- Services communicate with the world outside the application.
- Views are MonoBehaviours attached to GameObjects: the bits of the game your player actually sees and interacts with.
- Mediators are also MonoBehaviours, but with the very specific function of insulating the View from the rest of the app.
Here’s a chart showing how these pieces work together:
Set up your project
Download the Strange repo. Inside it you’ll find a complete Unity project with examples to look at (I suggest you go through these). Find a folder called "myfirstproject" and open the TextView.unity file within (StrangeIoC > examples > Assets > scenes > myfirstproject > TestView.unity).
Take note that, while I'm going to walk you through this project to get you comfy, you don't need nearly all the stuff you've downloaded when you use Strange in your own project. Everything you really need is in:
Assets/scripts/strange
and within that the important subdirectories are framework and extensions.
A scene is set...
When you open the scene in Unity you'll find a GameObject named “ViewGO” and a camera inside of it. ContextView will be the top of your game hierarchy and everything else will go inside it. Although Unity does not require you to have a singular top-level GameObject, Strange works best this way (specifically, when there is more than one context, Strange uses the display hierarchy to determine which Context any given View belongs to). There's also a MonoBehaviour attached called "MyFirstProjectRoot".
Play this simple app and see what it does. See what happens when you click on the rotating text. Nothing spectacular here. We're just demonstrating structure for now.
In the Property Inspector, double-click MyFirstProjectRoot to launch MonoDevelop.
A ContextView begins...
ContextView is a MonoBehaviour that instantiates your context. MyFirstProjectRoot subclasses ContextView, and is where our app begins.
using System;
using UnityEngine;
using strange.extensions.context.impl;

namespace strange.examples.myfirstproject
{
    public class MyFirstProjectRoot : ContextView
    {
        void Awake()
        {
            context = new MyFirstContext(this, true);
            context.Start ();
        }
    }
}
Note how we’re “using” the strange.extensions.context.impl folder. Everything in Strange is tightly namespaced like this, so you import only what you need.
The rest of this code is really simple. ContextView defines a property called context which of course refers to our context. We simply need to define what it is. We’ve writen one called MyFirstContext. The reference this refers to MyFirstProjectRoot. It tells the Context which GameObject is to be considered the ContextView. The trueindicates that once we call start, everything else will proceed. It can sometimes be useful to have the context run, but not actually launch the app (for example, if you’re awaiting the loading of a file), but this is a more advanced use case than we care about here.
Finally, call context.Start() to kick it into action.
The Context binds...
As I explained above, the Context is where all the binding happens. Without bindings, a Strange application is just a pile of disconnected parts. The Context is the glue that brings order to the chaos. Since we’re extending MVCSContext, we get a whole bunch of binding goodness for free without any work. MVCSContext is designed to give us everything we need to cleanly structure an IoC-style application: an Injector, a message bus, Command patterns, model and service support, and View mediation. Here’s the code for our simple Context.
using System;
using UnityEngine;
using strange.extensions.context.api;
using strange.extensions.context.impl;
using strange.extensions.dispatcher.eventdispatcher.api;
using strange.extensions.dispatcher.eventdispatcher.impl;

namespace strange.examples.myfirstproject
{
    public class MyFirstContext : MVCSContext
    {

        public MyFirstContext () : base()
        {
        }

        public MyFirstContext (MonoBehaviour view, bool autoStartup) : base(view, autoStartup)
        {
        }

        protected override void mapBindings()
        {
            injectionBinder.Bind<IExampleModel>()
                .To<ExampleModel>()
                .ToSingleton();
            injectionBinder.Bind<IExampleService>()
                .To<ExampleService>()
                .ToSingleton();

            mediationBinder.Bind<ExampleView>()
                .To<ExampleMediator>();

            commandBinder.Bind(ExampleEvent.REQUEST_WEB_SERVICE)
                .To<CallWebServiceCommand>();
            commandBinder.Bind(ContextEvent.START)
                .To<StartCommand>().Once ();

        }
    }
}
As you see we’re extending MVCSContext, which means we inherit all its mappings (you might find it interesting to explore that class in depth). So we already have things like an injectionBinder and a commandBinder and a dispatcher. Note that the dispatcher is accessible all across the app, and is coupled to the commandBinder, so any event dispatched can trigger callbacks and also trigger commands and sequences.
The mappings here are just what you’d expect if you’ve read about the various components. For injection, we’re mapping one model and one service, both as Singletons. We’re going to have just one view (ExampleView) for this example, and we bind it to a Mediator (ExampleMediator). Finally, we’re mapping two commands. The more important of the two is StartCommand. It’s bound to a special event: ContextEvent.START. This is the event fired to kick off your app. You should bind some command (or sequence) to it and think of that command as being like an init() for your entire app. Also see that we’ve bound it with .Once(), which a special method that Unbinds the event after a single firing.
Note that there's also a postBindings() method. This is a useful place to put other code you need to run after binding, but before Launch(). MVCSContext uses this to process any Views which register early (before mapBindings() is called). Another obvious and useful case for this is to call DontDestroyOnLoad(contextView) inside postBindings(), in order to retain the contextView (and the Context!) when you load in a new scene.
A Command fires...
So ContextEvent.START fires, and because it’s bound to StartCommand, a new instance of StartCommand will be instantiated and executed.
using System;
using UnityEngine;
using strange.extensions.context.api;
using strange.extensions.command.impl;
using strange.extensions.dispatcher.eventdispatcher.impl;

namespace strange.examples.myfirstproject
{
	public class StartCommand : EventCommand
	{
		[Inject(ContextKeys.CONTEXT_VIEW)]
		public GameObject contextView{get;set;}

		public override void Execute()
		{
			GameObject go = new GameObject();
			go.name = "ExampleView";
			go.AddComponent<ExampleView>();
			go.transform.parent = contextView.transform;
		}
	}
}
StartCommand extends EventCommand which means that (a) it’s a legal Command that the commandBinder can work with and (b) it inherits everything from Command and from EventCommand. In particular, extending EventCommand means that you get an IEvent injected and you get access to the dispatcher.
If you just extended Command, you wouldn’t have automatic access to those objects, but you could still inject them manually by adding this:
[Inject(ContextKeys.CONTEXT_DISPATCHER)]
IEventDispatcher dispatcher{get;set;}

[Inject]
IEvent evt{get;set;}
Note the two different types of injection being used here. IEventDispatcher and GameObject are both using named instances. That’s because we want to refer to very specific versions of these objects. We don’t want just any GameObject, we want the one marked as ContextView. Nor do will we settle for any old IEventDispatcher. The only one that will serve to communicate around the Context is the one marked by ContextKeys.CONTEXT_DISPATCHER. The IEvent, on the other hand, is simply mapped for the consumption of this particular command (technically it’s mapped to a “value”). So no name is required.
The dependency we’ll use in the current scenario is the ContextView. We’ll add a child view to it.
The Execute() method is automatically fired by the commandBinder. In most situations, the order of execution looks like this
- Instantiate the Command(s) bound to the IEvent.type.
- Inject the dependencies, including the IEvent itself.
- Call
Execute() - Delete the Command
The Command doesn’t have to be cleaned up immediately, but we’ll get to that in a bit. If you look at the code inside the Execute() method, you’ll see that it’s pure Unity. Create a GameObject, attach a MonoBehaviour to it, then parent that GameObject to ContextView. The specific MonoBehaviour we’re using, however, happens to be a Strange IView. And since we mapped that view in our context...
mediationBinder.Bind<ExampleView>().To<ExampleMediator>();
...the view is automatically mediated, which means a new ExampleMediator has just been created!
A View is mediated...
If you’ve spent more than a few minutes coding for Unity, you’ve created a View. You’d call it a MonoBehaviour, but the point is that a View is anything you see or interact with. I’m not going to spend any time walking through the ExampleView code. You can look in the example files and if you already know C# and Unity you won’t need it explained. I only want to draw your attention to two bits. First:
public class ExampleView : View
By extending View, you get the code that connects each View to the Context. To use Strange, you either need to extend View or write this functionality yourself. But if you don’t extend View, you still need to implement the IView interface. This is required to ensure that the Context can operate on your MonoBehaviour. (I might look for ways to fix this in a future version, allowing you to map a Mediator onto any MonoBehaviour).
The second item to point out:
[Inject]
public IEventDispatcher dispatcher{get; set;}
Note that we’re injecting IEventDispatcher. But this is NOT the same dispatcher as the one in StartCommand. Look closely at the code. The one in written in EventCommand (which I showed above) looks like this:
[Inject(ContextKeys.CONTEXT_DISPATCHER)]
public IEventDispatcher dispatcher{get; set;}
By naming the injection, the command specifies that it’s using the common context dispatcher. The View should never inject that dispatcher. The whole point of mediation is to insulate your view from the app and vice-versa. Strange allows injection into the View, but that capability is best when it’s tightly confined. Injecting a local dispatcher for communication with the Mediator is fine. So is injecting a config/layout file (which is useful if you’re publishing to multiple platforms). But if you listen to my advice at all, never inject a model or service or anything else that extends outside the pool of the View and its Mediator.
I’ll tell you right now: this is the hardest concept of this entire framework for most developers to grasp. A View should solely be about display and input. The View should inform the Mediator when certain inputs have occurred. The Mediator (which is allowed to inject the context dispatcher) abstracts the bit of View that is concerned with communicating with the rest of your app. This protects the app from view code — which is often chaotic — and protects your views when the reverse situation is the case.
So don’t say I never did nuthin’ for ya.
Finally in regard to views, note that the base View class uses standard MonoBehaviour handlers Awake(), Start(), and OnDestroy(). So if you override those handlers, make sure you call base.Awake(), etc so that the Strange bits run properly.
Now let’s look at the Mediator.
using System;
using UnityEngine;
using strange.extensions.dispatcher.eventdispatcher.api;
using strange.extensions.mediation.impl;

namespace strange.examples.myfirstproject
{
    public class ExampleMediator : EventMediator
    {
        [Inject]
        public ExampleView view{ get; set;}

        public override void OnRegister()
        {
            view.dispatcher.AddListener
				(ExampleView.CLICK_EVENT, onViewClicked);
            dispatcher.AddListener
				(ExampleEvent.SCORE_CHANGE, onScoreChange);
            view.init ();
        }

        public override void OnRemove()
        {
            view.dispatcher.RemoveListener
				(ExampleView.CLICK_EVENT, onViewClicked);
            dispatcher.RemoveListener
				(ExampleEvent.SCORE_CHANGE, onScoreChange);
            Debug.Log("Mediator OnRemove");
        }

        private void onViewClicked()
        {
            Debug.Log("View click detected");
            dispatcher.Dispatch(ExampleEvent.REQUEST_WEB_SERVICE,
				"http://www.thirdmotion.com/");
        }

        private void onScoreChange(IEvent evt)
        {
            string score = (string)evt.data;
            view.updateScore(score);
        }
    }
}
At the top, see where we’ve injected the ExampleView. This is how the Mediator knows about the View it’s mediating. Mediators are allowed to know quite a lot about their View. (The Mediator is often considered “throw-away code”, because it’s highly particular to the specifics of both the View and the App). Certainly this Mediator is allowed to know that the View has a dispatcher and that this dispatcher has an event called ExampleView.CLICK_EVENT. By listening to this event, the Mediator sets up a handler (onViewClicked()) which tells the rest of the app what this click means.
I emphasized those last words to once again clarify my earlier point: the View should not be sending the event REQUEST_WEB_SERVICE. The View is just a View. It should dispatch events like: HELP_BUTTON_CLICKED, COLLISION, SWIPE_RIGHT. It would be the job of the Mediator to map those events to ones meaningful to the rest of the app, such as REQUEST_HELP, MISSILE_ENEMY_COLLISION, PLAYER_RELOAD. The latter events are mapped to Commands and it’s these Commands which will call the help system, calculate a score increase (adding it to a score model) or determine if the player is allowed to reload.
The OnRegister() and OnRemove() methods are like constructors and deconstructors for the mediator. OnRegister() occurs right after injection, so I usually use it to set up listeners and call an init() function on the View. OnRemove() occurs as a result of the MonoBehaviour OnDestroy() call. It fires in time for you to clean up. Make sure you remove all your listeners or the Mediator may not be properly garbage collected.
Finally note that by extending EventMediator we have access to the common dispatcher. The Mediator listens for the SCORE_CHANGE event off the common bus, which we’ll come to in a moment. And when the View issues a click, the Mediator dispatches REQUEST_WEB_SERVICE to that same bus. Which brings us to...
Another Command fires...
Looking way back at the Context, there was this line which we sort of glossed over:
commandBinder.Bind(ExampleEvent.REQUEST_WEB_SERVICE).To<CallWebServiceCommand>();
This means that whenever the common bus receives this event, it’ll launch the CallWebServiceCommand. Now, we’re not going to actually call a web service, since this isn’t that kind of tutorial, but it draws your attention to a slightly different way of using Commands.
using System;
using System.Collections;
using UnityEngine;
using strange.extensions.context.api;
using strange.extensions.command.impl;
using strange.extensions.dispatcher.eventdispatcher.api;

namespace strange.examples.myfirstproject
{
    public class CallWebServiceCommand : EventCommand
    {
        [Inject]
        public IExampleModel model{get;set;}

        [Inject]
        public IExampleService service{get;set;}

        public override void Execute()
        {
            Retain ();
            service.dispatcher.AddListener
                (ExampleEvent.FULFILL_SERVICE_REQUEST, onComplete);
            string url = evt.data as string
            service.Request(url);
        }

        private void onComplete(IEvent result)
        {
            service.dispatcher.RemoveListener
			    (ExampleEvent.FULFILL_SERVICE_REQUEST, onComplete);
            model.data = result.data as string;
            dispatcher.Dispatch(ExampleEvent.SCORE_CHANGE, evt.data);
            Release ();
        }
    }
}
So by now, most of this should be intelligible to you. We’re injecting the ExampleModel and ExampleService into this command. We listen to the service, and call a method on it. We're using the data payload of the event fired by the mediator (the url). When the service finishes (which could be instantly or in 5ms or in 30 seconds!) it dispatches, triggering onComplete(). We unmap the listener, set a value on the model, then dispatch a SCORE_CHANGE which is received by the mediator.
This is all great, but if you’ve been paying close attention you’ll recall that I mentioned before that Commands are immediately cleaned up after Execute() complete. So why isn’t this Command garbage collected? The answer is the Retain() method called at the top of the Command. Retain() marks this Command as exempt from cleanup. It will be held onto until Release() is called. Obviously, this means that calling Release() is very important, or you run the risk of a memory leak.
And we’re served...
You can look at ExampleModel and ExampleService to see how they work, but they’re really simple. Models are just places to store data, and Services are involved in calling out to the Web (or elsewhere). They really have only one rule, but it’s simple.
DON’T ALLOW MODELS AND SERVICES TO LISTEN FOR EVENTS.
Let me repeat that. No, nevermind, it’s bold and in caps so you probably heard me. Models and Services are used by Commands, they’re not part of the communication chain, nor should they be used in that way. I can’t emphasize strongly enough that you don’t want to do this.
You can certainly inject into them, and there’s nothing the matter with injecting a local dispatcher (as we do here) and allowing it to talk back to your Commands. There’s also nothing wrong with injecting the context dispatcher and dispatching events. But...
DON’T ALLOW MODELS AND SERVICES TO LISTEN FOR EVENTS.
Oh, did I say that again? So sorry.
Mapping Across Contexts
Generally speaking, you want to abide by the Context boundary. After all, the boundary is there for a reason: it allows parts of your app to function in isolation, increasing modularity. But there are times when some object...perhaps a model, a service or a Signal...needs to be accessible across more than one Context. In v.0.6.0 of Strange we added a mechanism to make this easier, and easy it is:
injectionBinder.Bind<IStarship>().To<HeartOfGold>().ToSingleton().CrossContext();
Adding CrossContext() signals that the binding should be instantiated across the Context boundary. It will be available to all child Contexts. Note that you can also override a CrossContext binding. If you map the key locally, the local binding will override the CrossContext one.
4. Conclusion
That wraps up the Big, Strange How-To. You now know a lot about how Strange works and what it can do to make your world a better place. I suggest you try out the multiplecontexts example since that’ll open you up to more possibilities. I also suggest you build something with Strange, since there’s nothing like making for learning. If you’ve never used an IoC framework before, I guarantee it will improve your approach to coding. If you have, I hope it lives up to the experience you’ve had so far.
Finally, Strange was written to be extended. An endless number of Binders can be made to allow anything to trigger anything else. As others turn their minds to this way of thinking, I hope we’ll see loads of amazing (and Strange) add-ons.
After all, doesn’t everyone love a Strange world?